Are you ready to get your hands on the BEST recipe to make milk lotions? I’m ready to give it to you! I use sheep milk to make all of my milk lotions, but this recipe works great for any kind of milk, including goat milk, human milk, almond milk, yak milk, etc.
I’m not really sure how to milk an almond, but if you figure it out, let me know!
Want a video on how to get your lotion into bottles? Get the video and I’ll show you exactly how I load my lotion bottles. I’ll also share with you my TOP TIPS for making great milk lotion!
Before we get into the recipe and how-to of making the BEST sheep milk lotion, let’s cover some questions you may have along the way in regards to ingredients. Check out the sections below related to Oils and Butters, Emulsifiers and Stearic Acid, Preservatives, and Fragrances.
If you still have questions, you can always comment here at the Blog, e-mail me, or join the conversation over at DIY Sheep Crafts on Facebook.
About Oils and Butters
Use one oil and one butter, or many of each. It is all personal preference. I have a recipe that I, and my customers, absolutely love! Do some experimenting to see what works for you. Just keep it simple to start!
You will notice, in my oil recipe, that Coconut Oil is not listed. This is because I feel that Coconut Oil makes the lotion a little greasy. And we don’t need our smart phone screens covered in any finger, paw, or hoof prints, right? But, give it a try it if you must.
About Emulsifiers and Stearic Acid
You will need to add an emulsifier in order for your liquids and oils to combine into a stable emulsion. There are two main types of emulsifiers: Polysorbate-based and vegetable-based.
Emulsifiers that are basically Polysorbate, a derivative of the petrochemical industry, are not my favorite choice. Some people are allergic to polysorbates and others have reported more serious side-effects.
You’ve probably already guessed that I use a vegetable-based emulsifier. I’m all about limiting toxins in my body and in my environment. Vegetable emulsifiers are primarily made of Behentrimonium Methosulfate, derived from the natural plant oil Colza, aka Brassica Napus (or Rapeseed) Oil.
Stearic acid is not an emulsifier, and the name might sound a little scary, and it’s completely safe (non-toxic). Stearic acid gives lotion a little bit of thickness, and makes for a smooth finish when applying lotion to skin. But, you can totally make a great lotion without using Stearic Acid.
About Preservatives
There’s no easy way to say this, so I just going to spill the beans. If you are using sheep milk in your lotion, you need a serious preservative to keep the milk from spoiling and the lotion from molding. There is no natural preservative that does this. Believe me. I’ve tried… aaand it was a minor disaster.
Now that that’s out in the open, you can use Phenonip or Germaben II to perfectly preserve your lotion. Follow the directions on the bottle to determine the amount you need in your product, usually a small percent of the total weight.
You can get away with not using a preservative in milk lotion if the lotion is for personal use only, you keep it in the refrigerator, and use it within two weeks (tops).
About Adding Fragrance
You typically have two choices when it comes to adding fragrance to lotion – essential oils or fragrance oils. There are pros and cons to each.
Fragrance oils are more economical, as you will use much less than with essential oils, and they tend to be cheaper to buy than essential oils. The fragrance may last longer than essential oils, and they come in an endless amount of fragrance combinations. Also, they typically withstand higher heat while making lotions or soaps.
Essential oils are toxin-free, and can have therapeutic benefits, in addition to smelling amazing! If you are blending essential oils together, I recommend putting them in a diffuser first, so that you get an idea of what the fragrance combo really smells like! Be aware that some essential oils are contraindicated for certain medical conditions.
About FDA Cosmetics Regulations
If you are going to sell your lotion, which is considered a cosmetic, there are some simple regulations that you must adhere to, mostly in regards to labeling and product claims. You can learn more about FDA regulations (United States only) HERE.
Some countries have stricter regulations than the United States, like Canada. Research and follow guidelines for your country before selling any cosmetic product.
How to Make Sheep Milk Lotion – Tutorial and Recipe
Be sure to check out the video on how to get your lotion into bottles. Get the video HERE and I’ll show you exactly how I load my lotion bottles. I’ll also share with you my TOP TIPS for making great milk lotion!
The BEST Milk Lotion Recipe
Here it is! The BEST recipe for just about any kind of Milk Lotion. I love using sheep milk, but really you can use any kind of milk (goat, human, almond). Of course, I’m biased. However, I found this recipe to be deeply moisturizing and not greasy.
I get most of my ingredients from Essential Depot. Be sure to check them out for your Stearic acid, fragrance oils, organic essential oils, organic butters, and organic oils.
The recipe below yields approximately 25 oz of lotion. All measurements are by weight (not volume).
- 10 oz Distilled Water
- 10 oz Pasteurized Sheep Milk
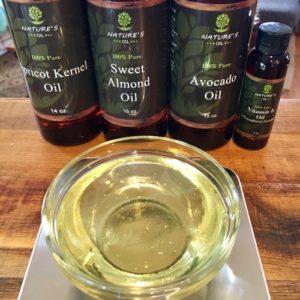
- 5.2 oz Oil(s) – such as, avocado, sweet almond, apricot kernel, sunflower, vitamin E
- 2.3 oz Butter(s) – such as, cocoa, kokum, shea, mango
- *3.9 oz Emulsifier
- 1.9 oz Stearic Acid
- *0.5 oz Preservative
- *0.5 oz Essential Oil(s)
*Amount varies based on the kind you are using and personal preference
You’ll Also Need

- Kitchen Scale
- Hand Blender
- Double Boiler x 2
- Spoons
- Spatula or Large Spoon
- Bowls and/or Measuring Pitchers
- Scissors
- Ziploc Bags
- Paper Towels
- Gloves
- Lotion Bottles (pump top or squeeze bottles)
Step 1: Sanitize Everything
Prepare your work surfaces, including your scale, by spraying them down with a sanitizer and wiping with a clean paper towel. You’ll also need to sanitize your hand blender, pots, cups, bowls, any utensils you will be using (or think you might be using), AND your lotion bottles and pumps. You don’t want any bacteria issues going on in your lotion, trust me!
To sanitize, I fill my sink with water and add a cap of bleach, or dilute 35% hydrogen peroxide. Pop all the tools into the sink for a soak, remove, and let them air dry. If you are pressed for time, you can dry everything with several clean paper towels.
I also leave the sink with the sanitizing solution in it while I make the lotion to dunk my gloved hands in on occasion. Also, please wear gloves while making your lotion, especially if you plan to sell it to other people.
Step 2: Get Your Ingredients Ready
Put your sheep milk in a water bath to thaw, if you haven’t already. As you may already know, I pasteurize and then freeze my sheep milk in 8, 10, or 12 oz quantities, by weight, in Ziploc bags, This makes for super-easy crafting later!
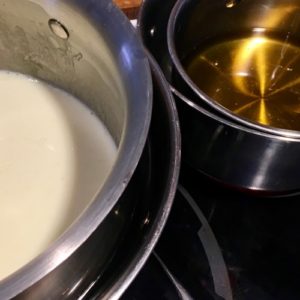
Start the two double boilers. Hopefully you have a larger set-up for your liquids, and a smaller one for your butters and oils.
Weigh out all of the ingredients (in the above recipe) using bowls/pitchers/cups and a kitchen scale. The amount of emulsifier, preservative, and essential or fragrance oils will definitely depend on the type you are using and your personal preference. If you are stuck, you can try a small test-batch first, and always feel free to comment here at the Blog, e-mail me, or join the conversation over at DIY Sheep Crafts on Facebook if you need guidance.
Step 3: Heat Things Up!
Combine all of the oils, butters, stearic acid, and emulsifier in your small double boiler and heat until they are completely melted. While you are doing this, warm the distilled water and milk in the larger double boiler. Keep an eye on each pot, stirring occasionally.
Do not add the preservative or fragrances yet!
Step 4: Blend
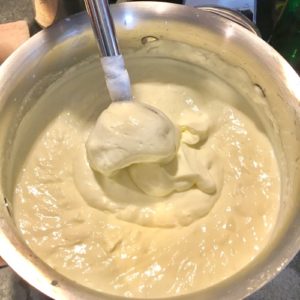
Once your oils are melted and liquids warmed, it’s time to blend!
Have your hand blender ready. Immerse the blender fully into the pot containing the liquids. Then, slowly pour the oils into the liquid pot as you blend. You’ll want to keep the blender fully submerged to prevent messes. Not-so-fun!
Once your lotion starts to thicken (it takes less than a minute), pour in the preservative and any fragrance you want to use.
Blend until everything is combined and you have a thick lotion. If your lotion isn’t thick enough, seriously, no big deal! Just melt more emulsifier, add it to the lotion, and blend.
Step 5: Package
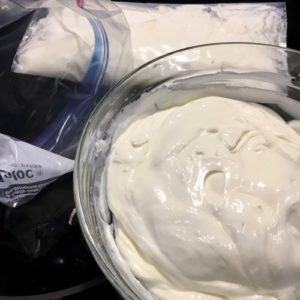
Now that you have a super-yummy milk lotion, you’ll want to package it into either pump or squeeze bottles. I do NOT recommend using jars, as this introduces bacteria into the lotion each time you dip in your fingers.
To get your lotion into the bottles, load your lotion into a Ziploc bag with a spatula or large spoon. Seal the bag. Then, cut a corner of the bag (a small snip will do), and squeeze the lotion into the bottle. If you are using a pump top, be sure to leave enough room inside the bottle for the straw and pump to fit without lotion overflow (don’t fill the bottle all the way to the top)!
If you are going to sell your lotion, be sure that you follow strict labeling and packaging laws for cosmetics.
Want a video on how to get your lotion into bottles? Get the video and I’ll show you exactly how I load my lotion bottles. I’ll also share with you my TOP TIPS for making great milk lotion!
Enjoy your lotion!
If you are having trouble, head over to the DIY Sheep Crafts group on Facebook. The community and I will be happy to help you! And remember to always…
Shepherd Like a Girl!

